


Dear reader,
You might be interested in installing the latest windows media player 11.Microsoft has decided to add a WGA check to this installation setup. When you try to install, it asks for a WGA check and will not continue the installation until it is checked whether your Windows installation is legitimate or not. We know that the users had problems with these WGA checks and could not install the player. Many have tried to install the player before but it checks and kicks off saying I cannot install. Unfortunately it happens even for legit copies.
Here is how to install the windows media player 11 without WGA check or validation:
1. Download the copy here.
2. Before you install ensure you have WMP 10 atlease in the system and have the latest SP3 installed for XP
3. Go to windows media player folder in program files. There rename the file "legitLibM.dll" to "legitlib.dll".
4. Now go to the folder where you have downloaded the setup and double click it. The installation starts but it asks us to validate. Click validate and the next screen comes up showing the heads up and showing you the type of install.This worked for me as well. I have heard that this might work even for the error "Windows cannot validate etc.,"
5. Rest is history and you know how to install :)
Good luck and let me know if I can help!
Showing posts with label how to. Show all posts
Showing posts with label how to. Show all posts
September 26, 2009
June 27, 2009
How to resize your partitions of the hard drive?
First thing - Take a backup of all the important data on CDs/DVD or any other external storage device. Your Data is important rgt?? Hmm...Now if you still didnt get the requirement here, Let me give an example. You have a drive 'E'. Say you have assigned 20 GB and now its getting rapidly filled up. Now you need more space!!! hmm...How can you do it? You have two options...
One is to remove all the partitions and create new partitions of your desired size.But this would completely remove or erase all your existing data from the hard drive.
The Second option is to use a third party partition management tool to resize the partitions of your hard drive. There are various tools available for the same. I am not going to explain on how to do it using a third party tools. I would just suggest some of the best ones.
Freewares - You need to do a lot of study for these and only then you can be live!

The Partition Magic is a very well known, trusted and powerful. But anything like this isn't free!!! It costs around 70$ but would be worth it instead of playing around with your valuable data. Check the Manual for the detailed steps and you can do it finally. Whatever tool you use, backup all your data first and most important - Ensure you donot lose power during the process. (Have a UPS and still any problem - Get an Inverter Power for your System!)
One is to remove all the partitions and create new partitions of your desired size.But this would completely remove or erase all your existing data from the hard drive.
The Second option is to use a third party partition management tool to resize the partitions of your hard drive. There are various tools available for the same. I am not going to explain on how to do it using a third party tools. I would just suggest some of the best ones.
Freewares - You need to do a lot of study for these and only then you can be live!
- Partition Logic
- EASEUS Partition Manager Home Edition (I am in office now and websense is blocking me to provide you an exact link for each of these. Do yourself a favor by googling this!)

The Partition Magic is a very well known, trusted and powerful. But anything like this isn't free!!! It costs around 70$ but would be worth it instead of playing around with your valuable data. Check the Manual for the detailed steps and you can do it finally. Whatever tool you use, backup all your data first and most important - Ensure you donot lose power during the process. (Have a UPS and still any problem - Get an Inverter Power for your System!)
USB 3.0 SuperSpeed!!!
We have discussed articles on how to use flashdrives in 98 and how to delete USB drive or USB hardware signature . Now check the below one which makes you smile!!!There needs to be no introduction on the USB 2.0. For years now, it has been the best and convenient way to connect peripherals to our computers.Its like we cant lead a life without the USB Storage devices and others.
USB Types:

These were quite sufficient till date with a max bitrate of 480 Mb/s.
Simple Flash drives - USB Storage Devices


But now at the age of HD Videos and terabyte harddisks, a new USB Successor is a MUST!!!In September 2007, Intel announced it was beginning to define the specifications of USB 3.0 and now at last, the successor is ready. Jan 2009 was the first time, as USB 3.0 device was demonstrated in public. The technology is proven to be ready and is working!!!
Most prominent feature is USB 3.0 is a 10x increase in the potential Data transfer rate i.e., approx 640 MB per sec of data can flow through a cable as compared to 480 Mb/s in USB 2.0. This also means you can copy 25 GB in not more than 60 Sec!!! Most Important thing and best appealing feature is
USB 3.0 is completely backwards compatible!!! This means that all current USB Devices still remain fully functional. Additional features include the data routing and the power saving modes.
USB Supported devices

For USB 3.0, in addition to the normal speed levels, a "SuperSpeed" level is introduced. This is what enables the transfer rate of upto 5Gb/s. The "SuperSpeed" mode operates with the help of 5 additional pins in the connector.


There is also a complex cable structure incorporated for this and the advantage is the support for full-duplex data transfer i.e., it can flow in both directions without reducing speed in any case. keep this in Mind - USB 3.0 Connectors should be BLUE in color to distinguish them from USB 2.0 connectors.

However, it looks externally pretty much the same.
Types of USB 3.0:

The USB 3.0 Type A Connector in the above looks the same and is completely backwards compatible.The type B Connector used for printers and hard drives, has a protusion at the top for new pins of SuperSpeed. The Micro USB Connector designed for digi cams or mobiles is however not compatible with existing setup and need an "Extension" to house them.
Bottomline:
===========
Users will not face any issues with USB 3.0 as its completely backwards compatible.
Peripherals will be able to run faster, especially hard drives.
New features like increased power draw and robust design.
Availability:- Probably in the early 2010!!!
pan>
June 23, 2009
How to rename your Disk drives?
Fellows - This is pretty basic. But since my blog is going to be transparent from beginner to geek, I would like to cover pretty basic fundamentals as well. So Geeks, you can get a coffee meanwhile!!!
Now for the readers - Have you ever wondered, if you dont know, that you can exactly change the names of the Disk Drives like C,D etc., to your names? Its pretty simple as well. If you are not sure, then herez how to do it...
1. Double click on the My Computer icon on your Desktop until it opens.
2. Then gently click on the drive you want to name just enough until it becomes highlighted.
3. Then right click on the selected drive, and click Rename OR you can simply highlight the drive and click F2 key to enter the new name which is max 32 characters
Note: If the drive already contains a name simply over type a new name in the box
4. Then click on the white space anywhere with a left click
Note: This will work for Windows XP or any new OS later.I didnt provide for Windows 98 as very minimal amount of people use it.
How to clean your Temporary System Files of IE6 or above?
Whenever you visit a web site or anything online, records of sites are stored in various directories on your computer or Lappy. This just functions as a cache and is helpful for the page to load faster if you bounce back to that particular site. But these temporary files can cause problems if they accumulate over a long period of time. Hence you need to delete temporary files so as to improve your system performance.This article tells you how to delete the temporary internet files.
level: Beginner and basic
1. For best results, close all your open programs until the Windows Desktop appears.
Open up the Internet Explorer browser in the manner that you usually do.Then you click on the word Tools, which is contained in your top tool bar area.There will be a dropdown menu coming up.
2. Then locate the three buttons entitled: Delete Cookies, Delete Files and Clear History.
3. Now click on each button and select OK each time Windows asks if you want to delete these files.Then click on the OK button at the bottom of the screen to exit the Internet Properties window.
The above will work for all earlier Windows versions as long Internet Explorer 6.0 or higher is installed on that system. This is because Internet Explorer 6.0 now includes the new Delete Cookies button and a new Delete Files button that does a decent job of wiping out Temporary Internet Files.
Note:- I will come up with a separate article on cleaning up private data for various browsers. Watch this space for more as this is very basic for a minimal audience!!!
June 12, 2009
Improve PC Speed - Remove Un-Used Programs & Files
If you use your PC regularly and you experiment on various softwares, then you may have a bunch of software packages on your hard drive and some of them might be no longer needed, or they were installed by you somehow. Tool bars, file-sharing programs, free email enhancers and download managers are notorious for this practices.. These uninvited ones can affect your startup time a lot and cause webpages to load slowly, and generally slow down your computer!
1. Click Start button
2. Select Control Panel
3. Double-click Add/Remove Programs icon
4. See what programs are installed that you don’t typically use
5. Select the Remove button for the ones you know you don't need in specific!
If you’re unsure about some programs, then do not remove and if you do, do a google search so that you will know what you are doing!!!!
Improve PC Speed - Disable File Indexing
Indexing Services is a small little program that uses large amounts of memory and can often make a computer endlessly loud and noisy. This system process indexes and updates lists of all the files that are on your computer. It does this so that when you do a search for something on your computer, it will search faster by scanning the index lists. If you don’t search your computer often, this system service is completely unnecessary.
To disable do the following:
1. Click Start button
2. Select the Control Panel
3. Double-click Add/Remove Programs
4. Click the Add/Remove Window Components icon on the left side of the window.This
may take a few seconds to load. Be patient.
5. Look for the "Indexing Services" component in the list
6. Uncheck the Indexing Services
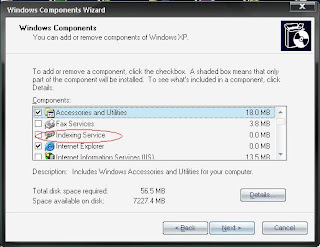
7. Click Next and then Click Finish
June 11, 2009
Increase PC Speed - Run Disk Clean-Up
If you use the System regularly, both Windows and application programs tend to leave temporary files lying around on your hard drive, taking up huge space. A hard drive that is close to being “full” can cause Windows to slow down or interfere with efficient disk access and virtual memory operations. This will ultimately affect your system's performance!
And moreover, if you surf the web a lot, your temporary internet files folder can become quite large, causing Internet Explorer to slow down or malfunction. Cleaning up unneeded files, scanning for disk errors and defragmenting the hard drive can help to restore some zip to your system.
Try to run once a month for peak performance. How can you do this? Here you go...
1. Double-click the My Computer icon.
2. Right-click on the C: drive (if your OS is installed on C)
3. Select Properties
4. Click the Disk Cleanup button (to the bottom-right of the Capacity pie graph)

5. Select check Temporary Internet Files and Recycle Bin

6. Click OK

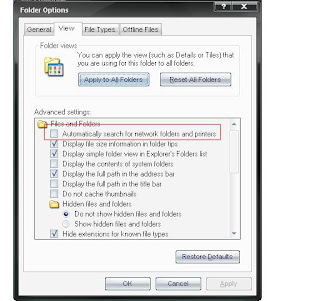
Increase your PC Speed - Speed up File-Browsing
You may have noticed that every time you open "My Computer" to browse folders that there is a slight delay everytime. As time goes by, this would be even more delayed which is when we find that our baby is growing old!
This is because Windows XP automatically searches for network files and printers every time you open Windows Explorer.To fix this and to increase browsing speed significantly:
1. Double-click on My Computer
2. Click the "Tools" menu
3. Select Folder Options
4. Click on the View tab.
5. Uncheck the Automatically search for network folders and printers check box
6. Click Apply and OK. Now Reboot your computer
This is because Windows XP automatically searches for network files and printers every time you open Windows Explorer.To fix this and to increase browsing speed significantly:
1. Double-click on My Computer
2. Click the "Tools" menu
3. Select Folder Options
4. Click on the View tab.
5. Uncheck the Automatically search for network folders and printers check box

6. Click Apply and OK. Now Reboot your computer
Increase PC Speed - Optimize Display Settings
If you are an user of XP - The look of these will be real sexy with all the visual items being displayed. But displaying all the visual items can really waste your system resources.So heres how you optimize: -
If you have Classic view Of Control Panel- Follow below:
1. Click the Start button
2. Select Control Panel
3. Double-click the "System" icon
4. Click the Advanced tab
5. In the Performance box click "Settings". It looks as below:

6. Now, the below screen appeard once you have clicked "settings"

Leave only the following ticked in the below screen:
a. Show shadows under menus
b. Show shadows under mouse pointer
c. Show translucent selection rectangle
d. Use drop shadows for icons labels on the desktop
e. Use visual styles on windows and buttons
7. Finally, click Apply and OK
------------------------------------------------------------------------------------------------
If you have Category view Of Control Panel- Follow below:
1. Click the Start button
2. Select Control Panel
3. Click "Performance and Maintenance" and click "Adjust Visual Effects"

4. Leave only the following ticked in the above screen
a. Show shadows under menus
b. Show shadows under mouse pointer
c. Show translucent selection rectangle
d. Use drop shadows for icons labels on the desktop
e. Use visual styles on windows and buttons
5. Finally, click Apply and OK
How to increase Windows Startup Speed?
You have an emergency at some point of time and you need some data in your system. So you start up your system. Now Hang On...There is no problem with your system actually...but yet the system actually takes too much time to start which is very annoying. Isn't it? So anything from harry here? Ofcourse!!!
FYI - There are certain programs that Windows will start every time you boot up your system, and during the startup phase, they're all competing for a slice of your CPU speed just like at Halls or demanded malls. Sounds funny but isnt. Extra or unwanted items in the startup list will definitely increase your startup time, perhaps by several minutes. Some common examples are things related to AOL, RealPlayer, Napster, instant messengers, and video players,managers,Torrent clients,boosters,Tracker checkers,Third Party Maintenance Software and what not...Alright - Lets come to Biz!!!
If you're not sure about an item, no big deal buddy! You can turn it off, restart your baby, and see if everything seems to work. If not, you can always go back and re-enable that item in the Startup list. This tip alone should speed up your start-up by 250%.
Here are is what you have to do:
1. Go to Start button Run
2. Type msconfig
3. Hit enter key or click the OK button
4. A System Configuration Utility window will show up
5. Click the Startup tab
6. In the Startup tab you will see several boxes and some of them will selected
(checked).All you have to do is to uncheck extra items that are of no use. If you
run an antivirus program it is not recommended to uncheck it.
7. After making you choices press the OK button, you will be prompted to restart
computer to apply changes.
8. After restarting your computer a dialogue will be displayed.
You can check the option for not showing this dialogue every time your PC reboots.
Ref: Speedsecrets
June 10, 2009
Unwanted OS Start Option on boot time/Startup screen
For people who have only one OS say XP, you might have tried to reinstall XP atleast once. Now while installing, after the contents have been copied to your hard drive, you might have changed your mind :) Why? Just kiddin...Ok...For some reason say you abort the setup, the next time you boot the PC, you will have two OS options asking you which one to start with a 30 Sec Timer !!!
Now this is not a big gun...But still - If you cant make it before 30 sec, the latest Setup would be selected as default and you will not be allowed to login normally.
Let me say - It might not only be Reinstall, even an upgrade to another OS also comes under the same case.
I myself faced this error many a times! Alright - Here you go - If you have a boot screen start option as below:
Microsoft Windows XP Setup(One you tried to install but for some reason didnt work)
Microsoft Windows XP
Microsoft Windows 98
Now you know that the first one is not required or even if it were as Vista but not fully installed and you want to get rid of that option and you only want your existing OSs' to be displayed - Do the following: -
Click Start | Run | Type "msconfig"
Go to the BOOT.INI tab. You will see the below screen

If you have the above mentioned example, you will have three lines under the "operating systems". Else if you have only two and you want to delete one, then it will be two under the "operating systems". Check the Screen for your ref.
Now Try clicking the "Check All Boot Paths" Option. It must remove the setup option automatically depending upon how incomplete the setup or the OS you want to remove is...If not, Click your desired Login OS Line, click "Set As Default" for that and set the timer timeout to 0 sec. Now you will login to your desired OS automatically without any issues!!!
June 09, 2009
How to remove the System Tray?
Windows Vista and previous versions of Windows have a system tray which allows you to access programs with ease. The tray is placed at the bottom right of the screen. If you want to remove or hide it for some reason, you cannot eliminate or hide it using any normal Windows function. But, here is how, you can do it with a simple registry hack.
Click ‘Start’ and type ‘regedit’.
Go to ‘HKEY_CURRENT_USER|Software|Microsoft|Windows|Current Version|Policies|Explorer’.
Right-click on the left pane and ‘New|DWORD (32-bit) Value’.
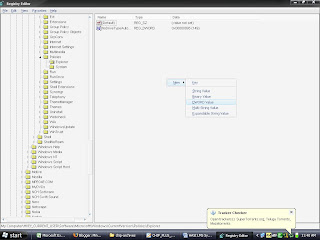
Type ‘NoTrayItemsDisplay’, double-click it and enter the value ‘1’.
Close the registry editor and reboot.
Ref: Chip
Click ‘Start’ and type ‘regedit’.
Go to ‘HKEY_CURRENT_USER|Software|Microsoft|Windows|Current Version|Policies|Explorer’.
Right-click on the left pane and ‘New|DWORD (32-bit) Value’.

Type ‘NoTrayItemsDisplay’, double-click it and enter the value ‘1’.
Close the registry editor and reboot.
Ref: Chip
How to display Run entry on Start Menu in Vista?
In Windows Vista, the Run entry on the Start menu is not readily available. I bet people who are used to older Windows Versions will always find it difficult. However if you are habituated to using Run on the Start menu, as it was in the previous Windows versions, here is what you need to do to activate it. So Check this: -
Right click ‘Start | Properties’.
In ‘Start’ menu, click ‘Customize’.
Scroll down, locate the ‘Run command’ check box.
Select and click on the ‘OK’ button to save the changes.
Ref: Chip
Right click ‘Start | Properties’.
In ‘Start’ menu, click ‘Customize’.
Scroll down, locate the ‘Run command’ check box.
Select and click on the ‘OK’ button to save the changes.
Ref: Chip
How to remove shortcut arrows in Vista?
Windows Vista Ultimate has an amazing graphical interface like you’ve never seen before. Wonder why?An arrow appears on every shortcut that is placed on the desktop or anywhere on the computer. But this can be very annoying and you may want to remove them some point of time. But you feel it difficult? All you need to do is edit the registry.Follow the steps listed below to do so. But do this carefully and if you want, take a back up before:
- Click ‘Start’ and type ‘regedit’
- Expand on folder named the ‘HKEY_CLASSES_ROOT’.
- Click the ‘Inkfi le’ folder.Type ‘AriochIsShortcut’ instead of ‘IsShortcut’
- Once close regedit and reboot.
- The arrows no longer appear on the shortcut icons.To reverse the process, replace ‘IsShortcut’ with ‘AriochIsShortcut’ and reboot the system.
How to create your own E-Card?
Creating personalized post cards is always fun! Most of the popular e-cards sites provide you with an option to customize your own holiday postcards. But all you can do on the websites is add your own or custom images. But with the help of this article, you can personalize your card for every occassion, along with the perfect text...you desire and its all yours buddy!!!
1. Visit http://www.photo-card-maker.com/download.html
2. Download the software Photo Card Maker. Install it by double clicking the EXE
3. Start the program once you install it and it looks like below

4. Click on “Select Template”. Select a template through the “Category” drop-down
menu. Click on a template in the main window. Click “OK”.
5. To change text on the card, click on “Text”. You can add new text, change the font face, size and color on your card. You can clear out the text by clicking on “Delete”.

6. You can place personalized images on every template. Click on “Photo”. Browse and open the image. Scale according to your requirement. Click outside the image.
7. To make changes in the future, click on “Template” and click on “Save Template”. Your text elements will be preserved, but your image will be discarded.
8. To save the card as a *.jpg image, click on the “Save” button. Browse for the location, and type an approriate file name. Your card is ready to be mailed now!!
June 06, 2009
ERROR 0189: Invalid RFID Configuration Information Area
I have read this post in some magazine. This is for the laptop guys and gals!When a user switch on the laptop, he/she might receive an error like:
ERROR 0189: Invalid RFID Configuration Information Area. PRESS (F1) to Setup.
Even if you load the setup defaults in the BIOS, this doesnt help. So if you want to know what exactly it is to some extent, pretty simple yet hard for you!!! The BIOS might have a problem buddy.This can be solved by your manufacturer service center.In order to restore your operating system to normal, you may have deleted some partition originally created on the hard drive by manufacturer. In the mean while, you can press the [ESC] key to continue booting
regularly till you get the problem solved by your manufacturer's help center.
How to enable or disable autorun or autoplay for CDs,DVDs,USBs?
After some time or may be anytime, everyone will have seen this error. This is not actually error as you can still open the CD via "Open" button in the context menu. However the regular autoplay feature doesn't work. As soon as the CD or DVD is inserted, the programs start from them. Sometimes they don't.
You can enable or disable the feature of using autorun for removable devices like CD ROM or USB devices. Please carryout the below steps to avail of these features:-

You can enable or disable the feature of using autorun for removable devices like CD ROM or USB devices. Please carryout the below steps to avail of these features:-
- Go to 'Start | Run'
- Type 'gpedit.msc' and press enter (The group policy editor can be used to enable/disable access to diff levels of security). This is how it would look

- Go to User Coniguration | Administrative Templates | System’ in the left panel of the ‘Group Policy Object Editor’ as shown.
- Double click on ‘Turn off Autoplay’ in the right panel and choose ‘Disabled’
- Save all settings and exit. Restart you computer and your problem should be solved
June 05, 2009
How to login safely even without a cursor?
Windows sometimes forgets the cursor on the Welcome screen, so you cannot click to enter the login password. But a restart is very annoying rgt? So how can we login then? I have a very useful one here for you.
In many cases, this problem occurs after a user logs of.However, a restart is not necessary or rather not recommended, since it also logs of other active users and destroys data that might not have been saved and takes an unnecessarily long time to reboot in the process.Instead, you
can deal with the problem by using the classic logon dialog box. If Windows doesnt welcome you with a cursor, you can login thru the classic dialog box.
For that, press the [Ctrl] + [Alt] + [Del] keyboard shortcut twice in succession. Another login dialog box, probably familiar from earlier versions of Windows, appears. Enter the username as well as password here.
Note: This method works only after a user logs of and not for fast switching.
Windows XP | Windows Vista | Windows 98
This section would discuss various tips and tricks to improve the user experience and even improve the system performance. Please go through the below articles:
- How to defragment your hard drives in a jiffy?
- How to change your LOGON screen?
- How to delete a USB drive or USB device’s hardware signature?
- How to find bad memory in vista?
- How to use USB Flashdrives in Windows 98?
- How to make your XP look like vista?
- How to restrict the users of a system from using USB devices or DVDROMS?
- How to login safely even without a cursor?
- How to enable or disable the autorun or autoplay feature for CD, DVD, USB?
- How to display RUN on Start Menu in Vista?
- How to remove Shortcut arrows in Vista?
- How to change the timer and how to remove unwanted OS Start up option on Boot screen?
- How to remove the System Tray on your monitor?
- How to increase Windows Startup speed?
- How to optimize display settings for best performance and excellent display?
- How to speed up the Offline browsing speed in your computer?
- How to remove unused programs and files?
- How to disable file Indexing and improve PC Speed?
- How to enable DMA and increase PC Speed?
- How to run disk clean up and improve PC Speed?
- How to reduce Page file size and improve PC Speed?
- How to speedup file browsing in your system?
- How to optimize your display settings for best performance and not losing visually?
- How to clean your temporary Internet files from IE6?
- How to rename your disk drives in My Computer?
- How to start the system console in a required size immediately?
- How to delete the restore points and shadow copies in windows 7?